MyPass Windows Client
What is the Windows Client?
The MyPass Windows Client is a software component that integrates seamlessly with the login interfaces of Windows workstations, enabling users to access the MyPass Self-Service solution without requiring prior authentication to the workstation. This allows employees to reset their passwords or unlock their accounts directly from the Windows login screen, simplifying the process of regaining access to their systems. The Windows Client facilitates password reset and account unlock operations through a secure, locked-down browser interface displayed on the login screen.
Why use the Windows Client?
The MyPass Windows Client offers significant benefits for both end-users and IT administrators in corporate environments:
- Pre-Windows Login Browser Access to MyPass: One of the most powerful features of the MyPass Windows Client is its ability to provide access to the MyPass Password Manager before a user logs into Windows.
- Enhanced User Experience: By embedding password reset and account unlock capabilities directly into the Windows login screen, users can resolve access issues without contacting IT support. This reduces downtime and frustration, particularly in scenarios where users forget their passwords or lock their accounts.
- Reduced IT Support Burden: The self-service nature of the Windows Client minimizes helpdesk tickets related to password resets, allowing IT teams to focus on more critical tasks.
- Improved Security: The client uses a secure, locked-down browser that restricts access to only authorized MyPass server URLs and approved file extensions, ensuring safe operations even before domain authentication.
- Streamlined Enrollment: The Enrollment Enforcement Client ensures users are enrolled in the MyPass system, maintaining compliance with organizational security policies and reducing the risk of unverified users.
- Compatibility and Flexibility: The client supports various Windows versions, including Windows 7 (requiring a wired or fixed Wi-Fi connection) and Windows 10/11 (with built-in Wi-Fi connection options at the login screen), making it adaptable to different network environments.
Additional Features
- Enrollment Enforcement Client (EEC): The primary function of this feature is to compel users to enroll in Self-Service through interactive Microsoft Windows pop-ups, thereby driving user adoption of the platform. This feature resides on users' workstations and performs periodic enrollment checks. If users are not yet enrolled, they will receive on-screen prompts to enroll in Self-Service until their grace period expires, after which they must complete enrollment before they can close the pop-up message.
More on the ECC Feature
The Enrollment Enforcement Client (EEC), bundled with the Windows Client, ensures that users are enrolled in the MyPass Password Manager, maintaining compliance with organizational security policies. Key aspects of this feature include:
- Automatic Activation: The EEC runs in the user session and is visible as an icon in the Windows Notification area (typically in the lower right corner). It starts automatically when a user logs into the PC.
- Enrollment Status Monitoring: The EEC periodically queries the MyPass server to check the user’s enrollment status and stores this information in the user registry. Administrators can configure prompt intervals and behaviors to suit organizational needs.
- User-Friendly Enrollment Process: When a user clicks the “Enroll” button, the EEC opens the first applicable enrollment authentication profile based on the user’s group membership, network conditions, and authentication requirements. If multiple options are available, the client presents an “Identify Operations” page listing possible enrollment methods. By default, profiles using Windows passwords are prioritized for simplicity.
- Customizable Behavior: Administrators can adjust the EEC’s prompting frequency and actions to balance user convenience and compliance requirements.
This feature eliminates the need for extensive end-user education by embedding enrollment prompts directly into the user’s workflow, ensuring seamless adoption of the MyPass solution.
- Remote Password Cache Update: This feature utilizes a concealed VPN connection to enable a user's machine to connect to the company network and update its locally cached password following a reset performed via the Windows Client. This ensures that the newly set password is applied to the current workstation, allowing seamless access from any location worldwide. Read the full article here.
More on Remote Password Cache Update Feature
- Automatic Cache Update: After a password reset, the client uses a specifically trained VPN connection to update the locally cached password on the user's device, ensuring the new credentials are available even if the machine was previously locked or offline from anywhere in the world.
- Seamless User Experience: Users can regain access to their workstation from anywhere in the world without needing to return to the office or connect directly to the corporate network.
- Reduced Support Calls: By automating the password cache update process, IT teams receive fewer requests for assistance with login issues after a password change.
- Enhanced Security: The feature ensures that only the latest password is stored locally, minimizing the risk of credential mismatches and unauthorized access.
By providing a user-friendly, secure, and efficient solution, the MyPass Windows Client enhances productivity and strengthens organizational security.
Package Installation
The MyPass Windows Client offers flexible installation methods to suit various organizational needs. It can be installed manually using the provided .msi install package, allowing administrators to deploy the client directly on individual machines. Alternatively, for larger-scale deployments, the client can be packaged and distributed using software distribution tools like Microsoft System Center Configuration Manager (SCCM). This enables streamlined, automated deployment across multiple devices, ensuring efficient setup and compliance with organizational security policies.
Pre-Requisites
- Latest installation package Windows Client version 4.5.0.25074
- .NET Framework version 4.5 or later
Command-line install procedure
This installation prodecure utilizes the Command Prompt windows tool to install the Windows Client installation package:
- Locate the Install Package.
- Copy the MyPass Windows Client .msi file to the target machine or ensure it is accessible from a network location.
- Open a Command Prompt or PowerShell with administrative privileges.
- Run the following command, depending on the location of the configuration file (local or network location):
- From administrative CMD and changed directory to the
.msifile location:<MSIFILE> /quiet SERVERURL=”https://<CustomURL>/FastPassClient/Default.aspx”.
- Control Panel or Task Manager can be monitored to confirm when the package installation finishes.
- Once finished, reboot the machine for everything to take affect.
- The Windows Client "Launch Panel" will now be visible from the Windows lock screen.
The
<customURL>will be provided by the MyPass team during the implementation phase of the platform. The placeholder text together with the symbols will have to be replaced.
Install wizard procedure
This installation prodecure utilizes the Command Prompt windows tool to install the Windows Client installation package:
- Locate the Install Package.
- Copy the MyPass Windows Client .msi file to the target machine or ensure it is accessible from a network location.
- Open a Command Prompt or PowerShell with administrative privileges.
- Run the following command, depending on the location of the configuration file (local or network location):
- From administrative CMD and changed directory to the
.msifile location:<MSIFILE>.
- Give it a moment to open the install wizard.
- Once finished, reboot the machine for everything to take affect.
- The Windows Client "Launch Panel" will now be visible from the Windows lock screen.
The
<customURL>will be provided by the MyPass team during the implementation phase of the platform. The placeholder text together with the symbols will have to be replaced.
Customization
The MyPass Windows Client offers flexible installation methods to suit various organizational needs. It can be installed manually using the provided .msi package, allowing administrators to deploy the client directly to individual machines. For larger-scale deployments, the client can be packaged and distributed using software distribution tools such as Microsoft System Center Configuration Manager (MECM) or Microsoft Intune. This enables streamlined, automated deployment across multiple devices, ensuring efficient setup and compliance with organizational security policies.
This section will guide you through customizing different layouts, applicable to Windows Client version 3.5.2 or later. You can modify colors, sizes, text, fonts, and locations. Customizations are made directly in the PMWindowsClient.Config.xml file located within C:/Program Files (x86)/FastPassCorp/PMWindowsClient. Both the configuration file and any images used for customization must be distributed to all clients, either by editing the .msi file or by using a package deployment tool to add the files after installation.
Within the config file, the design is controlled by the displayoptions entity block. Below is an example of how PMWindowsClient.Config.xml is structured in the FastPass Windows Client when setting a new layout. The displayoptions section allows you to control the layout of both the Launch Panel and the Splash Screen.
Customization differs from version to version so please ensure that you have the latest installed version of your MyPass Windows Client package before starting with the customization steps
PMWindowsClient.Config.xml Example File
<WindowsClientConfig xmlns='http://www.fastpasscorp.com/WindowsClient'>
  <Options xmlns=''>
    <Option Name='LaunchWindow-DisplayOptions-Window-BackColor' Value='White' />
    <Option  Name='LaunchWindow-DisplayOptions-OuterFrame-BackColor' Value='White' />
    <Option Name='LaunchWindow-DisplayOptions-MiddleFrame-BackColor' Value='Custom' />
    <Option Name='LaunchWindow-DisplayOptions-MiddleFrame-BackColorA' Value='50' />
    <Option Name='LaunchWindow-DisplayOptions-MiddleFrame-BackColorR' Value='192' />
    <Option Name='LaunchWindow-DisplayOptions-MiddleFrame-BackColorG' Value='0' />
    <Option Name='LaunchWindow-DisplayOptions-MiddleFrame-BackColorB' Value='0' />
    <Option Name='LaunchWindow-DisplayOptions-InnerFrame-BackColor' Value='White' />
    <Option Name='LaunchWindow-DisplayOptions-HeaderText-ForeColor' Value='Custom' />
    <Option Name='LaunchWindow-DisplayOptions-HeaderText-ForeColorA' Value='255' />
    <Option Name='LaunchWindow-DisplayOptions-HeaderText-ForeColorR' Value='195' />
    <Option Name='LaunchWindow-DisplayOptions-HeaderText-ForeColorG' Value='0' />
    <Option Name='LaunchWindow-DisplayOptions-HeaderText-ForeColorB' Value='0' />
    <Option Name='LaunchWindow-DisplayOptions-DetailText-ForeColor' Value='Custom' />
    <Option Name='LaunchWindow-DisplayOptions-DetailText-ForeColorA' Value='255' />
    <Option Name='LaunchWindow-DisplayOptions-DetailText-ForeColorR' Value='195' />
    <Option Name='LaunchWindow-DisplayOptions-DetailText-ForeColorG' Value='0' />
    <Option Name='LaunchWindow-DisplayOptions-DetailText-ForeColorB' Value='0' />
    <Option Name='LaunchWindow-DisplayOptions-IconBox-Image' Value='file:C:\Temp\NewLogo.png' />
    <Option Name='SplashWindow-DisplayOptions-Window-BackColor' Value='White' />
    <Option Name='SplashWindow-DisplayOptions-OuterFrame-BackColor' Value='White' />
    <Option Name='SplashWindow-DisplayOptions-MiddleFrame-BackColor' Value='Custom' />
    <Option Name='SplashWindow-DisplayOptions-MiddleFrame-BackColorA' Value='50' />
    <Option Name='SplashWindow-DisplayOptions-MiddleFrame-BackColorR' Value='192' />
    <Option Name='SplashWindow-DisplayOptions-MiddleFrame-BackColorG' Value='0' />
    <Option Name='SplashWindow-DisplayOptions-MiddleFrame-BackColorB' Value='0' />
    <Option Name='SplashWindow-DisplayOptions-InnerFrame-BackColor' Value='White' />
    <Option Name='SplashWindow-DisplayOptions-HeaderText-ForeColor' Value='Custom' />
    <Option Name='SplashWindow-DisplayOptions-HeaderText-ForeColorA' Value='255' />
    <Option Name='SplashWindow-DisplayOptions-HeaderText-ForeColorR' Value='195' />
    <Option Name='SplashWindow-DisplayOptions-HeaderText-ForeColorG' Value='0' />
    <Option Name='SplashWindow-DisplayOptions-HeaderText-ForeColorB' Value='0' />
    <Option Name='SplashWindow-DisplayOptions-DetailText-ForeColor' Value='Custom' />
    <Option Name='SplashWindow-DisplayOptions-DetailText-ForeColorA' Value='255' />
    <Option Name='SplashWindow-DisplayOptions-DetailText-ForeColorR' Value='195' />
    <Option Name='SplashWindow-DisplayOptions-DetailText-ForeColorG' Value='0' />
    <Option Name='SplashWindow-DisplayOptions-DetailText-ForeColorB' Value='0' />
    <Option Name='SplashWindow-DisplayOptions-StatusText-ForeColor' Value='Custom' />
    <Option Name='SplashWindow-DisplayOptions-StatusText-ForeColorA' Value='255' />
    <Option Name='SplashWindow-DisplayOptions-StatusText-ForeColorR' Value='195' />
    <Option Name='SplashWindow-DisplayOptions-StatusText-ForeColorG' Value='0' />
    <Option Name='SplashWindow-DisplayOptions-StatusText-ForeColorB' Value='0' />
    <Option Name='SplashWindow-DisplayOptions-IconBox-Image' Value='file:C:\Temp\NewLogo.png' />
    <Option Name='EnrollmentEnforcementClient-DisplayOptions-IconBox-Image' Value='file:C:\Temp\NewLogo.png' />
    <Option Name='EnrollmentEnforcementClient-DisplayOptions-IconBox-SizingWidthMethodFixedValue' Value='100' />
    <Option Name='UpdatePasswordCache' Value='True' />
    <Option Name='UpdatePasswordCacheForAnyDomain' Value='False' />
    <Option Name='LaunchWindow-DisplayOptions-Window-Anchor' Value='Top|Left' />
    <Option Name='EnrollmentEnforcementClient-Enabled' Value='True' />
    <Option Name='EnrollmentEnforcementClient-Enabled' Value='True' />
    <Option Name='EnrollmentEnforcementClient-DefaultCheckInterval' Value='90' />
    <Option Name='EnrollmentEnforcementClient-FailureCheckInterval' Value='90' />
    <Option Name='EnrollmentEnforcementClient-PostponedCheckInterval' Value='5' />
    <Option Name='EnrollmentEnforcementClient-StartupDelay' Value='3' />
    <Option Name='EnrollmentEnforcementClient-MinimumRandomTimingVariance' Value='0' />
    <Option Name='EnrollmentEnforcementClient-MaximumRandomTimingVariance' Value='0' />
    <Option Name='EnrollmentEnforcementClient-MinimumRandomTimingVarianceAfterPostpone' Value='0' />
    <Option Name='EnrollmentEnforcementClient-MaximumRandomTimingVarianceAfterPostpone' Value='0' />
    <Option Name='EnrollmentEnforcementClient-MinimumRandomTimingVarianceAfterFailure' Value='0' />
    <Option Name='EnrollmentEnforcementClient-MaximumRandomTimingVarianceAfterFailure' Value='0' />
    <Option Name='EnrollmentEnforcementClient-UrlModificationVariant' Value='InitiateTrackWithIdentifyOperationForEnrollment' />
  </Options>
  <Services xmlns=''>
    <Service>
      <Conditions>
        <Condition Type='WebProbe' Url='https://server896.domain2016.local/FastPassClient/' Timeout='10000' />
      </Conditions>
      <Servers>
        <Server Url='https://server896.domain2016.local/FastPassClient/Default.aspx' Timeout='10000' Proxy='' ProxyByPassOnLocal='true' ProxyByPassList='' />
      </Servers>
    </Service>
  </Services>
Now lets look at the sections that you are able to make changes to:
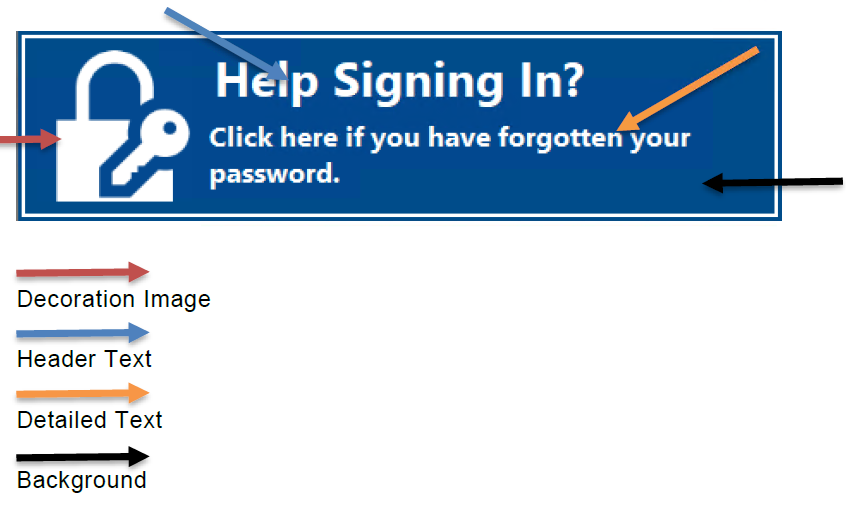
1. The Launch Panel
MyPass Windows Client V4.5
Controlling the Launch Panel positioning
<Option Name='LaunchWindow-DisplayOptions-Window-Anchor' Value='Top|Right' />
Possible values for 'LaunchWindow-DisplayOptions-Window-Anchor are Top and Bottom, Left and Right.
Controlling the color of the Launch Panel header text
<Option Name='LaunchWindow-DisplayOptions-HeaderText-ForeColor' Value='Custom' />
<Option Name='LaunchWindow-DisplayOptions-HeaderText-ForeColorA' Value='255' />
<Option Name='LaunchWindow-DisplayOptions-HeaderText-ForeColorR' Value='195' />
<Option Name='LaunchWindow-DisplayOptions-HeaderText-ForeColorG' Value='0' />
<Option Name='LaunchWindow-DisplayOptions-HeaderText-ForeColorB' Value='0' />
Controlling the color of the Launch Panel detail text
<Option Name='LaunchWindow-DisplayOptions-DetailText-ForeColor' Value='Custom' />
<Option Name='LaunchWindow-DisplayOptions-DetailText-ForeColorA' Value='255' />
<Option Name='LaunchWindow-DisplayOptions-DetailText-ForeColorR' Value='195' />
<Option Name='LaunchWindow-DisplayOptions-DetailText-ForeColorG' Value='0' />
<Option Name='LaunchWindow-DisplayOptions-DetailText-ForeColorB' Value='0' />
Controlling the Launch Panel decoration image
<Option Name='LaunchWindow-DisplayOptions-IconBox-Image' Value='file:C:\Temp\NewLogo.png' />
Controlling the Launch Panel window background color (Borders Included)
All backgrounds can use stolid colors or RGB:
<Option Name=’LaunchWindow-DisplayOptions-Window-BackColor' Value='White' />
The transparency can be controlled by the BackColorA variable:
<Option Name='LaunchWindow-DisplayOptions-Window-BackColor' ' Value='Custom' />
<Option Name='LaunchWindow-DisplayOptions-Window-BackColorA' Value='50' />
<Option Name='LaunchWindow-DisplayOptions-Window-BackColorR' Value='192' />
<Option Name='LaunchWindow-DisplayOptions-Window-BackColorG' Value='0' />
<Option Name='LaunchWindow-DisplayOptions-Window-BackColorB' Value='0' />
Border options follow from here
Changing the outer border background color and transparency
<Option Name='LaunchWindow-DisplayOptions-OuterFrame-BackColor' Value='White' />

<Option Name='LaunchWindow-DisplayOptions-OuterFrame-BackColor' ' Value='Custom' />
<Option Name='LaunchWindow-DisplayOptions-OuterFrame-BackColorA' Value='50' />
<Option Name='LaunchWindow-DisplayOptions-OuterFrame-BackColorR' Value='192' />
<Option Name='LaunchWindow-DisplayOptions-OuterFrame-BackColorG' Value='0' />
<Option Name='LaunchWindow-DisplayOptions-OuterFrame-BackColorB' Value='0' />
Changing the middle border background color
<Option Name='LaunchWindow-DisplayOptions-MiddleFrame-BackColor' Value='White' />

<Option Name='LaunchWindow-DisplayOptions-MiddleFrame-BackColor' Value='Custom' />
<Option Name='LaunchWindow-DisplayOptions-MiddleFrame-BackColorA' Value='50' />
<Option Name='LaunchWindow-DisplayOptions-MiddleFrame-BackColorR' Value='192' />
<Option Name='LaunchWindow-DisplayOptions-MiddleFrame-BackColorG' Value='0' />
<Option Name='LaunchWindow-DisplayOptions-MiddleFrame-BackColorB' Value='0' />
Changing the inner border background color
<Option Name='LaunchWindow-DisplayOptions-InnerFrame-BackColor' Value='White' />

<Option Name='LaunchWindow-DisplayOptions-InnerFrame-BackColor' Value='Custom' />
<Option Name='LaunchWindow-DisplayOptions-InnerFrame-BackColorA' Value='50' />
<Option Name='LaunchWindow-DisplayOptions-InnerFrame-BackColorR' Value='192' />
<Option Name='LaunchWindow-DisplayOptions-InnerFrame-BackColorG' Value='0' />
<Option Name='LaunchWindow-DisplayOptions-InnerFrame-BackColorB' Value='0' />
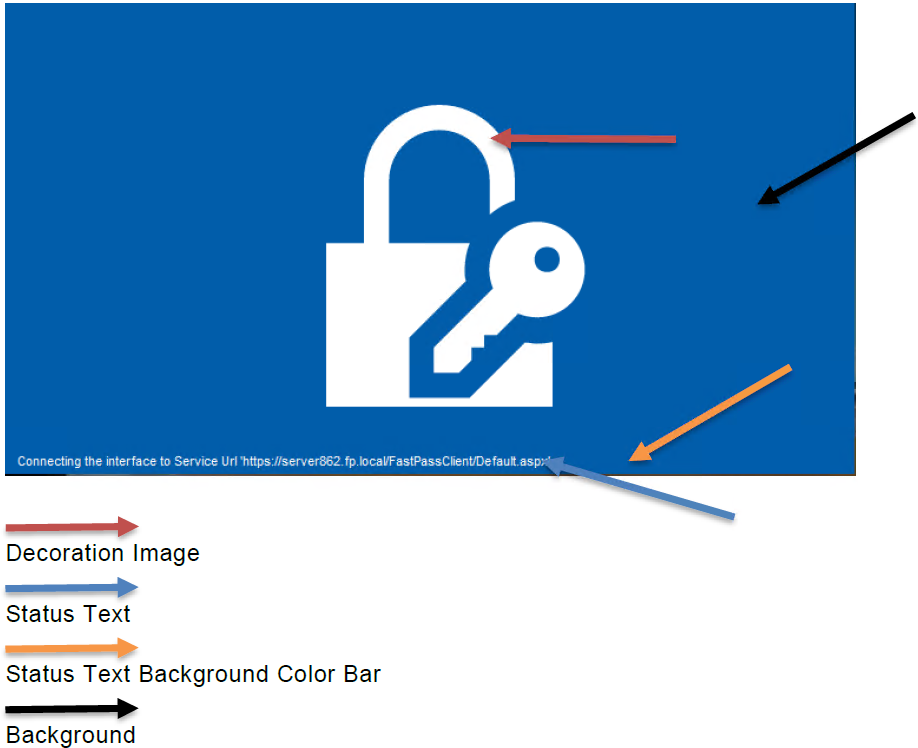
2. The Splash Screen
MyPass Windows Client V4.5
Controlling the Splash screen size
<SplashScreenWindowWidth value="800" />
<SplashScreenWindowHeight value="400" />
Controlling the Splash Screen decoration image
These settings will change the decoration image in the Splash Panel. Download an appropriate BMP, PNG or JPG file for the organization and copy it in the FastPassCorp\Configuration\PMWindowsClient folder on the local PC.
<Option Name='SplashWindow-DisplayOptions-IconBox-Image' Value='file:C:\Temp\NewLogo.png' />
If the images are not showing up in the lunch panel or splash screen. It is recommended that the images should be saved through another photo editing tool, Windows Paint works fine.
Controlling the Splash Screen position of the decoration image
<SplashScreenDecorationImagePositionX value="50" />
<SplashScreenDecorationImagePositionY value="50" />
Controlling the Splash Screen decoration image size
<SplashScreenDecorationImagePositionX value="50" />
<SplashScreenDecorationImagePositionY value="50" />
Controlling the Splash Screen status text bar color
<SplashScreenStatusBarTextColorR value="255" />
<SplashScreenStatusBarTextColorG value="255" />
<SplashScreenStatusBarTextColorB value="255" />
Controlling the Splash Screen status background color bar
<SplashScreenStatusBarTextColorR value="255" />
<SplashScreenStatusBarTextColorG value="255" />
<SplashScreenStatusBarTextColorB value="255" />
Controlling the Splash Screen text color
<Option Name='LaunchWindow-DisplayOptions-HeaderText-ForeColor' Value='Custom' />
<Option Name='LaunchWindow-DisplayOptions-HeaderText-ForeColorA' Value='255' />
<Option Name='LaunchWindow-DisplayOptions-HeaderText-ForeColorR' Value='195' />
<Option Name='LaunchWindow-DisplayOptions-HeaderText-ForeColorG' Value='0' />
<Option Name='LaunchWindow-DisplayOptions-HeaderText-ForeColorB' Value='0' />
<Option Name='LaunchWindow-DisplayOptions-DetailText-ForeColor' Value='Custom' />
<Option Name='LaunchWindow-DisplayOptions-DetailText-ForeColorA' Value='255' />
<Option Name='LaunchWindow-DisplayOptions-DetailText-ForeColorR' Value='195' />
<Option Name='LaunchWindow-DisplayOptions-DetailText-ForeColorG' Value='0' />
<Option Name='LaunchWindow-DisplayOptions-DetailText-ForeColorB' Value='0' />
Controlling the Splash Screen background color
<Option Name='SplashWindow-DisplayOptions-Window-BackColor' Value='White' />
<Option Name='SplashWindow-DisplayOptions-OuterFrame-BackColor' Value='White' />
<Option Name='SplashWindow-DisplayOptions-MiddleFrame-BackColor' Value='Custom' />
<Option Name='SplashWindow-DisplayOptions-MiddleFrame-BackColorA' Value='50' />
<Option Name='SplashWindow-DisplayOptions-MiddleFrame-BackColorR' Value='192' />
<Option Name='SplashWindow-DisplayOptions-MiddleFrame-BackColorG' Value='0' />
<Option Name='SplashWindow-DisplayOptions-MiddleFrame-BackColorB' Value='0' />
<Option Name='SplashWindow-DisplayOptions-InnerFrame-BackColor' Value='White' />
Conclusion
The MyPass Windows Client, with its integrated Enrollment Enforcement Client, is a vital tool for organizations seeking to simplify password management and enhance security. By enabling self-service password resets and account unlocks directly from the Windows login screen, it reduces IT support demands and improves user productivity. Its secure, pre-login browser access and robust enrollment enforcement features ensure that users can access and adopt the MyPass solution effortlessly, while administrators maintain control over security policies. Whether you’re an IT professional looking to streamline authentication processes or an end-user seeking a hassle-free way to manage passwords, the MyPass Windows Client delivers a reliable, user-friendly solution while driving adoption.
The MyPass Windows Client, with its integrated Enrollment Enforcement Client, is a vital tool for organizations seeking to simplify password management and enhance security. By enabling self-service password resets and account unlocks directly from the Windows login screen, it reduces IT support demands and improves user productivity. Its secure, pre-login browser access and robust enrollment enforcement features ensure that users can access and adopt the MyPass solution effortlessly, while administrators maintain control over security policies. Whether you’re an IT professional looking to streamline authentication processes or an end-user seeking a hassle-free way to manage passwords, the MyPass Windows Client delivers a reliable, user-friendly solution while driving adoption.